Setting up EC2 instance for jupyter notebook
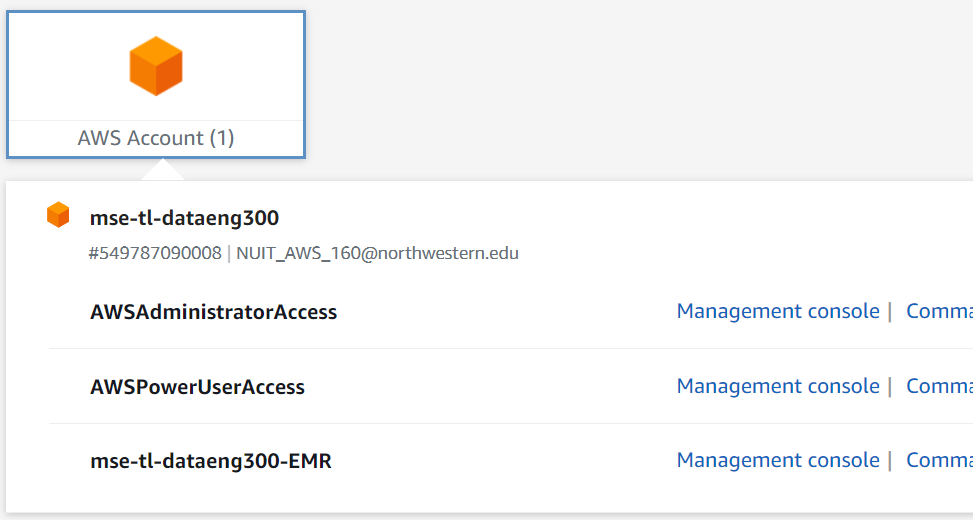
- Access AWS
- Always access AWS by using the Northwestern AWS portal and your NetID: https://nu-sso.awsapps.com/start/
- You should have access through the
mse-tl-dataeng300-EMRuser account. - If you do not, reach out to the instructor.
- (Preferred) Check that you are in the
N. Virginiaregion (right top corner).
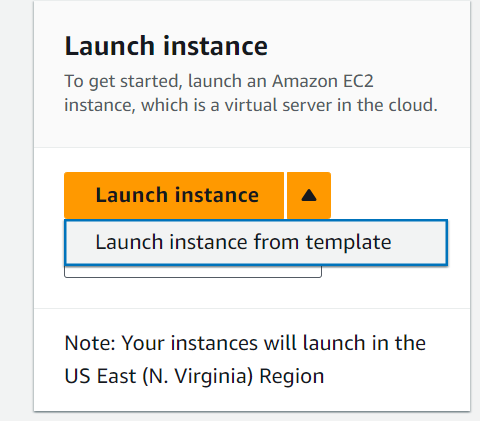
- If you do not currently have an EC2 instance under your name, launch an EC2 instance, by doing the following:
- Services -> EC2
- (Optional) Launch an instance using
Launch instance from template:- You will find a
de300-t2.mediumtemplate available.
- You will find a
- Verify the following configurations (or set up an instance from scratch):
- Image: AMI (Linux 64-bit)
- Instance type:
t2.medium - Key pair: You should create a new key pair for your instance (if you do not currently have one).
- Name your key pair name in the same way such that you can identify it. Default options are fine.
- Upon creating a key pair, a “key file”
[name].pemwill be automatically downloaded. Store it somewhere your machine has read/write access to. - (You only have to do this once.) run
chmod 400 [name].pemon your console. (If you use a Windows machine, use either bash or PowerShell.) The command modifies the “key file” to be read-only.
- Subnet:
RDS-Pvt-subnet-5 - Firewall: Select
launch-wizard-3security group - Storage: Specify 12 Gb of EBS storage.
- Resource tags: Key:
Name, Value:[firstname][lastname]-de300as your instance name.
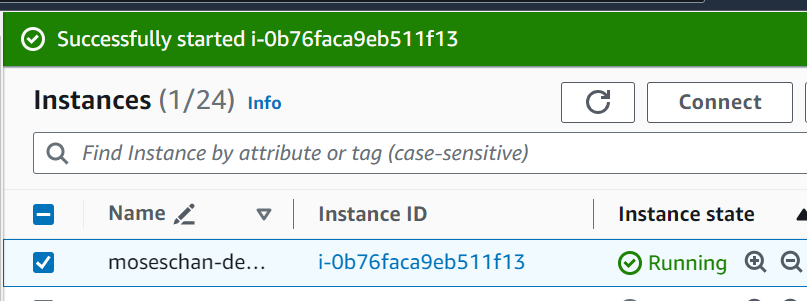
- Launch instance.
- An instance will be running automatically. You may track running instances under the
Instancespage.
- An instance will be running automatically. You may track running instances under the
- SSH into EC2
- Once your instance is running, select the instance under the
Instancespage and hitConnect. - Under the
SSH clienttab, you will see the instructions to connect to the EC2 instance via SSH on your console. - Troubleshoot:
- If access is denied, double check your
[name].pemfile is located in your console working directory. - If an error about unprotected key arises, make sure you have run
chmod 400 [name].pem.
- If access is denied, double check your
- Once your instance is running, select the instance under the
- Anaconda installation on EC2
- Fetch source code:
wget https://repo.anaconda.com/archive/Anaconda3-2023.09-0-Linux-x86_64.shor the appropriate source code. - (Optional) Verify the source code SHA256 key:
sha256sum [filename].sh. - Install:
bash Anaconda3-2023.09-0-Linux-x86_64.sh- The first prompt requires you to read the agreement and respond
yes - You may have to confirm the location of installation. The default is fine.
- By the end of installation, you will see a prompt about
conda init, you may respondyessuch that each time you log into EC2, the conda environment is automatically loaded.
- The first prompt requires you to read the agreement and respond
- Activate conda environment:
- If you responded yes above, run
source .bashrcto activate the conda environment. You should see(base)as the beginning of your console cursor. - If you did not respond yes above, you can run
eval "$($CONDA_PATH/bin/conda shell.bash hook)"to activate the conda environment.
- If you responded yes above, run
- To verify that Anaconda is successfully installed, you can run
which pythonin the console, and a path to the Python executables should be returned.- If no python is found, it means that your conda environment was not successfully activated.
- Fetch source code:
- Set Jupyter notebook password
- Run
jupyter notebook password. - Enter and verify your password.
- Run
- SSH into Jupyter notebook on EC2
- In the console where EC2 is running, run
jupyter notebook --no-browser --port=8888 - Once a jupyter notebook is running, open a new console on your local machine.
- On the new console, run
ssh -i [name].pem -N -f -L 8888:localhost:8888 ec2-user@[your-public-DNS].compute-1.amazonaws.com. - Open a new browser (Chrome, Firefox, etc.), access https://localhost:8888.
- Enter your password to access your Jupyter notebook.
- In the console where EC2 is running, run
- Stop your EC2 instance on AWS
Instancespage.
Important: Whenever you are not running anything (for more than 15 minutes), you should stop the EC2 instance on the AWS Instances page.
Reconnect to EC2 Jupyter notebook
- Start your EC2 instance from https://nu-sso.awsapps.com/start/. (The one you have a private key for.)
- Once the EC2 instance is running, connect to the instance via SSH
- Under the SSH client tab, you will see the instructions to connect to the EC2 instance via SSH on your console.
- If your EC2 console shows
(base)before your cursor, it indicates that conda environment is already running.- If not, you have to run
eval "$($CONDA_PATH/bin/conda shell.bash hook)"to activate the conda environment.
- If not, you have to run
- SSH into Jupyter notebook on EC2 (as in step 7 above.)